


In our last home, I had framed photos dispersed throughout our house (wedding pictures, friends + family pictures, etc.) I loved the warm vibe it brought to our home and I truly think that those photos made our house feel like a home! However, in our new house, I am trying to be minimal with the decor because we have Ava now! It doesn’t matter how many times I put away her toys, there’s something about a baby that always makes me feel like I’m right on the edge of our house looking cluttered, HA!
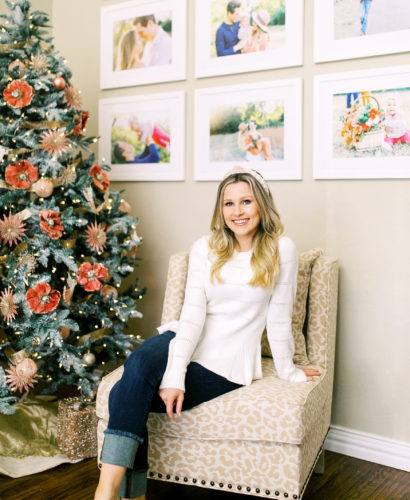
Since we moved into our new house I KNEW I wanted to hang a gallery wall in our living room. A gallery wall allows you to warm up a room with personal photos AND give the space a clean + organized look. Our living room needed this! We spend all our time in this room so I wanted it to look organized and clean, but still feel like “us”.
Since the time I’ve shared the gallery wall on Instagram, I’ve received SO many questions about how I made it, where the frames are from, what size photos to use, how to hang it, etc. There actually are quite a few steps and “rules” I followed to get this final look, so I will share them with you below! I hope to answer all the questions because I am OBSESSED with the final look and I would love for you to have this in your home as well!
Keep Your Photos Consistent.
This is THE MOST important part, you guys! A unified aesthetic to the photos is essential for a clean gallery wall. After you decide on a location for your gallery wall, the next step is to pick the photos for the wall! You need to imagine your wall as literal art- and ask yourself if you would expect to find these photos altogether. The thing is, you want these photos to have a consistent look throughout AND complement the rest of the decor in the room!

Don’t stress. You have a few options to achieve this! One option is to apply one filter to all of the photos that you will hang on the wall. (Black + White maybe?) So if you have photos from your wedding, your daughter’s first birthday, and a honeymoon photo- a filter will easily unify all these photos.
Your other option is to use all photos from the same photoshoot which is what I did! I went back and forth with this ONE MILLION TIMES because I couldn’t decide if I wanted to incorporate our wedding photos and vacation pictures in the gallery wall. Ultimately, I decided to just use all our new photos from this shoot because I’m really trying to focus on the here + now and let go of the past, ha! (But THAT subject is for an entirely different blog post!)
I used the same photos from our Christmas Cards! All of these photos were photographed by Katie Chang Photography and they are literally my favorite photos ever. I love you and your talented little self, Katie!
Pick Your Frame.
Would you believe me if I told you that I designed our entire gallery wall in less than 30 minutes? I chose frames from CanvasPop and that made this whole process so easy. CanvasPop is an online custom framing service that frames your favorite photos FOR YOU and ships them straight to your doorstep ready to hang!

The design process was seamless you guys. You upload the image you want, choose the size and matte you want, pick the perfect frame and you’re done! If your photos are in need of a little sprucing up, The CanvasPop customizer has BEAUTIFUL filters and effects that you can apply directly to your final print.
When it comes to choosing your frame style, you want to pick one frame style to get that clean + crisp look. I chose the 17.5″ x 20.5″ White Wood Frame, with a matted 11″ x 14″ photo. My frames arrived completely ready to hang!
Hang It Grid Style.
I literally can not tell you how excited I was when I opened up the box and saw these prints for the first time. My frames arrived with the photos printed, in the frame, protected with glass, and ready to hang!
Before you hang the photos, decide on your layout and keep in mind that “grid-style” is best! 😉 Especially for a blank wall because it’s high impact. All of the pieces come together to look like one unified statement piece, which is exactly what a blank wall needs!
In terms of placement, I opened up all nine photos on my computer and created a “grid” and moved them around until I liked the arrangement. Then I got my husband! Ha! We started by hanging the first photo in the middle and then measured and placed each photo exactly 2.5 inches apart.
This wall somehow makes our entire house feel cozier and more like home. If you’re thinking about a gallery wall in your house trust me and JUST DO IT because you will be obsessed with it!
Investing in custom frames will make all the difference in the process and your final wall. I am so happy I went with CanvasPop and I literally recommend this company to everyone now! For the holiday season, they are offering 50% off their custom frames, which is such an insane deal I can’t even handle it.
You can design your custom frame HERE and use code HOHOHALF to get 50% off at checkout!
I hope this answers all the gallery wall questions and encourages you to create the home that you want! It was honestly so easy and fun to design this and I feel so proud of myself every time I look at that wall! Ha! If I can do it, YOU CAN DO IT.
All my love,
Alex


This post was created in a collaboration with CanvasPop. All selections and opinions are my own!
SHOP THE POST


")


Read the Comments +